
Here are some simple tips to help you instantly take better iPhone pictures!
Want to know some great iPhone video editing apps? Check out this post.
Table of Contents
9 Tips To Instantly Take Better Phone Pictures
01. Wipe Off Your Lens!
Obvious, but very often forgotten. Your iphone camera lens almost always has smudges on it. Get in the habit of wiping it every single time before you take photos. It will DRAMATICALLY improve the quality of your iphone photos. I just use my shirt to wipe it; you can also get a cleaning cloth if you want to get fancy.
Check out the two photos below taken 5 seconds apart. The only difference? Yep, you guessed it. A clean camera lens.
02. Adjust Light & Exposure
Tap the subject of your photo, and you’ll see a sun icon appear on the right of the focus area. You can toggle this up and down to create a lighter/darker image. My advice with this feature is to try to make the exposure of the photo match what you’re seeing with your eyes.
Pro Tip: Tap and hold on the subject of your photo to lock in the exposure. That way it won’t change even if you shift the frame slightly. (This also locks in the focus of the photo.)
03. Enable the Grid
Go to Settings – Camera – and check Grid. You can use the grid to help you frame your shot, for example making sure the horizon and lines of your photo are level. You can also use the grid lines to put the subject of your photo either in the center box, or on one of the intersections of the grid lines. You don’t always have to follow those guidelines precisely, but it’s a great starting point!
04. Adjust Depth & Create Bokeh in Portrait Mode
Bohek is that beautiful, professional blur of the background of your photos. Tap the “f” on the top right of your screen to play around with the depth of your photo. The lower the number, the more blurred your background will be. The higher the number, the more in focus your entire photo will be.
Pro Tip: Did you know that on newer iPhone models, you can adjust the bokeh of your photo AFTER you take it? Open the photo in your camera roll, tap “edit,” then on the top left tap that little oval with the “f” followed by a number (ex: f 4.5). That will open up a depth slider underneath your photo, and you can slide it to adjust the bokeh to your liking and then resave the photo. So cool!
Pro Tip #2: For iPhone X and 11 users, you can shoot Portrait Mode on the front-facing camera, too! Selfie game strong!
05. Capture Movement With Burst Mode
Tap the shutter button and immediately slide it to the left to shoot in Burst Mode. Hold it to the left and it’ll keep shooting until you let go. Then head to your camera roll and the “burst” will show as just a single photo. To select your favorites, tap “select” at the bottom to scroll through all the images in the burst.
Pro Tip: Avoid camera shake during burst mode to keep these photos in focus!
06. Avoid Manual Zoom
Don’t zoom in by pinching your fingers on the screen. You instantly lose a ton of quality that way. Make sure to only use one of the primary camera zoom options available on your iPhone model. The blue circle in the photo below shows where they are located. (In Portrait Mode, they are located just to the left of that)
If you want a more zoomed-in photo, you have 3 options:
1- Take your photo without zoom and crop it later (this is what I did to the photo below)
2- Use the 2x camera zoom (if your iPhone has it)
3- Just walk closer to your subject before taking the photo!
07. Edit With High-Quality Presets
Presets are a game changer. And you don’t need to be a skilled editor to make your pictures look amazing. Presets are essentially filters for your photos that you use in the free Lightroom app. Lots of creators sell theirs, including myself! Shameless self promotion: I have three packs available with three different styles, you can check them out in My Shop.
If you want another resource to help you take your editing to the next level, you can get my 10 High-Level Lightroom Editing Tips Guide, it comes with a totally free preset, too!
Check out the before and after below – this photo has my Moody preset applied with one-click & no additional edits
08- Find Your Light
Lighting is essential with photography in general, but even more-so for iPhone photography since you can’t shoot in manual mode and adjust settings like shutter speed (yet!). When indoors, make sure have your subject face a window to brighten up the photo (see example below.) If you’re taking photos outdoors mid-day when the sun is straight up, find some shade to shoot in. If you’re shooting in the morning or at night, make sure to shoot with the sun behind the camera, instead of shooting directly into it.
A classic example is shown here. I’m standing in the exact same spot in both photos, I’m simply turned 180 degrees so I’m facing opposite directions. The photo where I’m facing the window is 1000x better because I’m facing the window. The low-quality, grainy photo has the window backlighting my photo.
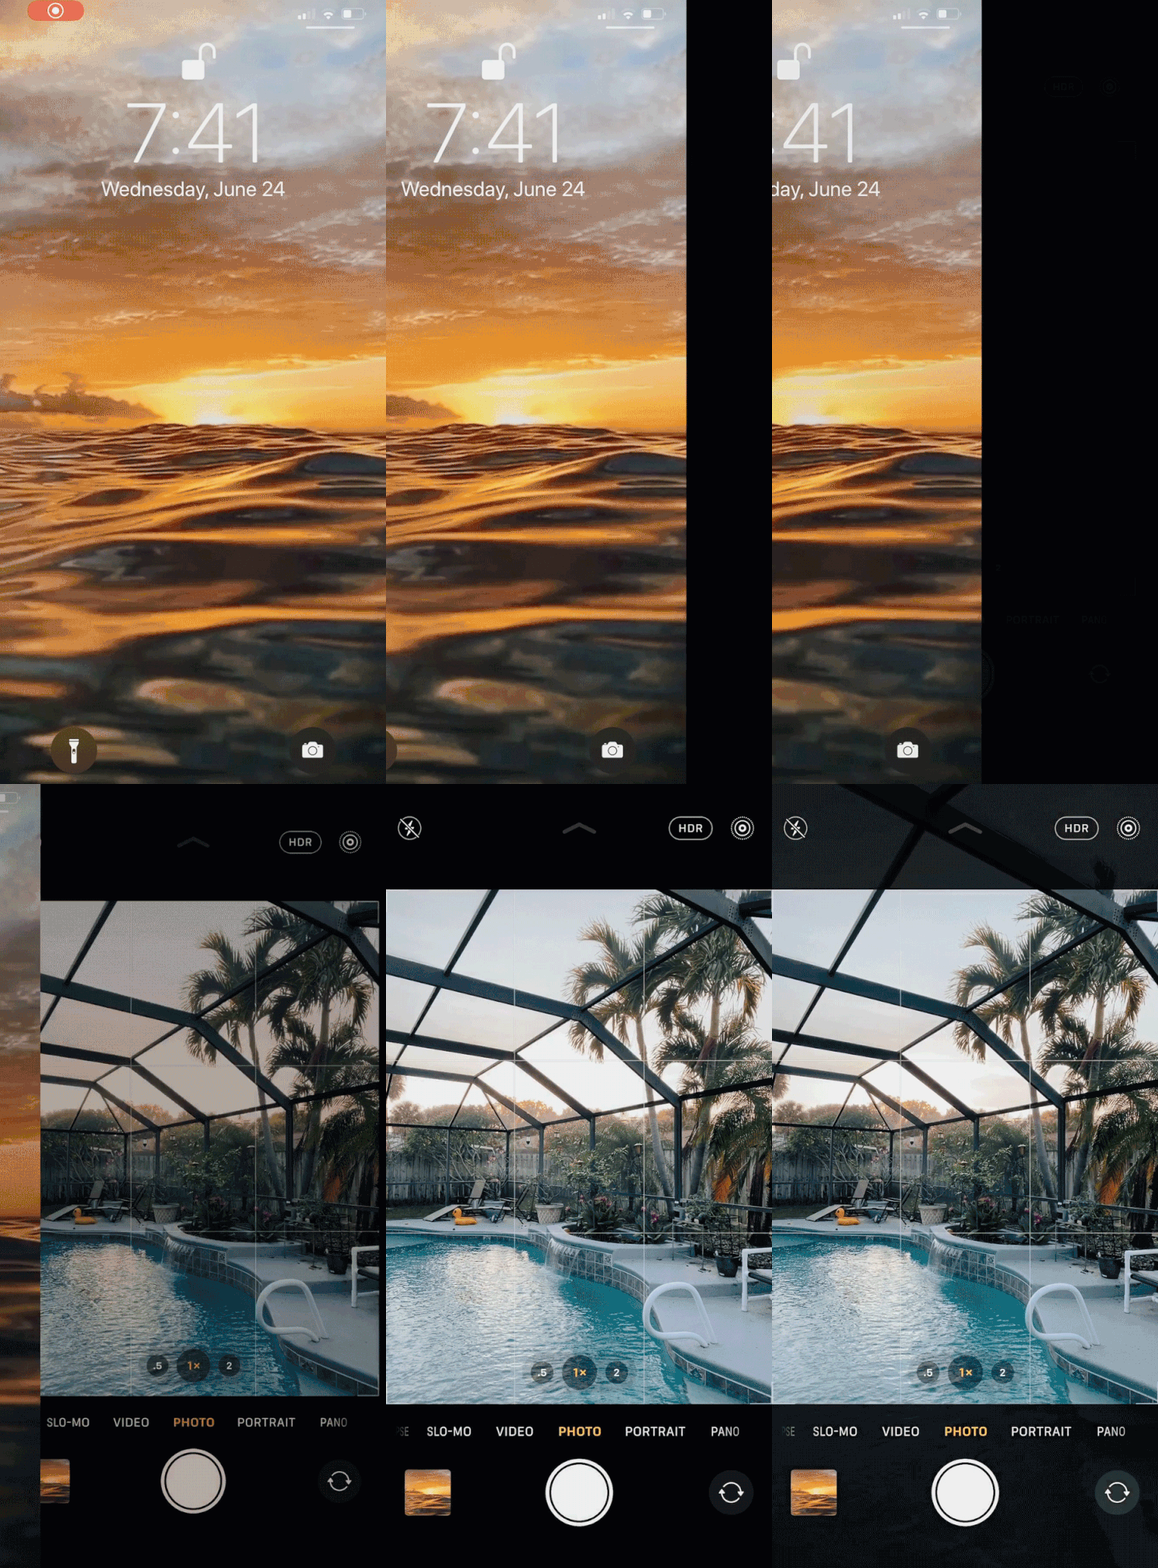
09. Swipe Left on Lock Screen to Open Camera
Sometimes, picture-perfect moments happen so quickly that by the time you unlock your phone and open the camera app, the moment has passed. On your lock screen, swipe left for quick access to the iPhone camera.
This is a very underrated iPhone shortcut, I use it all the time!
That’s it, for now! Did you find this helpful? Do you want to know more iPhone photography tips? Let me know in the comments!
Meet the Writer
Hi, I'm Teresa!
Thank you for taking the time to read my little space on the internet. I’m a digital creator, blogger & environmental advocate.
Leave a Comment Cancel reply
Pingback: 10 iPhone Tricks & Hidden Features Most People Don't Know About - Teresa Ann Moon on June 24, 2020
Pingback: 50 Smile Instagram Captions on June 24, 2020


2 COMMENTS